Tuesday 3 December 2013

Geometric Festive Garland DIY

It's the most wonderful time of the year again. In honour of the season this DIY is a festive garland tutorial. 


What you will need and how to DIY:

1. Your choice of paper or cardboard. I chose gold and black cardboard for something subtly festive.
2. Glue, both normal craft glue and hot glue and hot glue gun.
3. Scissors
4. Ruler to fold shape or if you have one, a scorer for thicker cardboard.
5. String.
6. Printed templates on normal paper.
Download the template HERE.

Firstly glue the template onto the back of the cardboard.

 Cut the shapes. For the cone shape, cut the long side zig zagged.

 Fold all the shapes along the black lines.

Using the hot glue gun, stick together the shapes with the tabs leaving one side unclosed.
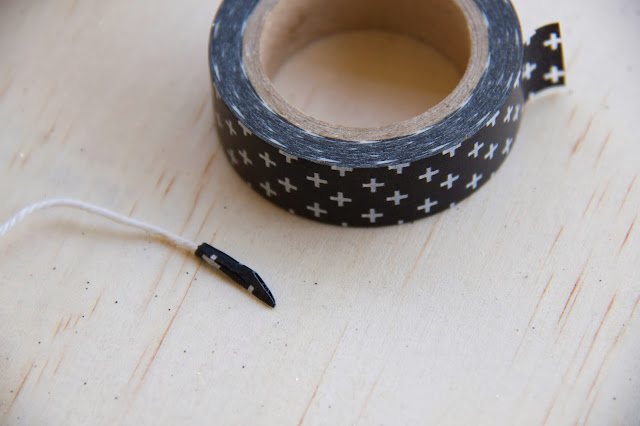


Cut 6 10cm pieces strings. I used sticky tape on the ends the string for easy threading.

 Poke a small hole in end you want to hang the shape by. Thread the string through the hole and tie a knot on the end.

Tape down the string on the inside of the paper shape. Glue down the last side.

Geometric Festive Garland


Friday 15 November 2013

How to cut out an object in Photoshop cs6

This tutorial will teach you how to cut out an image to be placed on a different background. 
This basic tutorial is one of the most useful and powerful tools I have learnt in Photoshop.
There are many ways to do this but this is the easiest way I have found to do it.
This tutorial features a marble background (tutorial coming soon) and Country Road's roll up pineapple t-shirt


Step 1: Chose a background and image you would like to cut out to put on the background. Open both in Photoshop. I used Photoshop CS6 however any version can be used for this tutorial. You will need to convert the images from "background." Double click the "background" layer and a box will pop up. Select "ok."


Step 2: Go to the chosen image you would like to cut out and select the Polygonal Lasso Tool

Step 3: Begin to trace the outline of the shirt by moving the mouse along and clicking.

 Step 4: Once you have finished the outline close the selection by clicking on the point you started from. You should get the dotted line effect around the whole image.
 Step 5: The next step is to smoothen the outline. At the top of the window select "refine edge." In the smooth box enter 1. You can refine the selection further by adding some feather to it but don't add too much other wise the edge will become fuzzy. Click "ok."


Step 6: Copy your selection and paste onto your background image. Alternatively drag the selection into the background image.


That's all there is to this tutorial. You can now create your own image using a background and your favourite objects. This tutorial is perfect for creating collages.

Friday 20 September 2013

DIY Layered Pinata Cake


This year I turned 22 and wanted to make myself a cake that was both mature and fun. Embracing my Latino culture, I decided to made a piƱata cake. I chose to keep the cake completely white so when opened, a lovely surprise of colourful lollies would spurt out. To see how I made it, view the DIY below the images.


What you will need and how to DIY:


Two packets of cake mix, black colour gel, 2 cake tins of the same size, lots of frosting, skewers, string and washi tape. 
Sorry about the quality of the photos, I took these photos at 10pm in a dark kitchen.


Follow the instructions of the cake mixes, I made one first and then for the second one added black colour gel. Follow all instructions and after you take the cakes out of the oven cover them in cling wrap. This is done to soften any crunchy bits on the outside, making it easier to cut.
To make the layers you can use a knife or a cake layer cutter like the one pictured above. When all layers are cut, place the bottom layer on your cake stand and make a layer of frosting. Repeat for the remaining levels except for the top layer, leave the last layer off (I forgot this step). 


To make the hole for the lollies I used a tall glass and just pushed it down layer by layer leaving one layer on the bottom. Now there is a hole for all the lollies. Don't pack the lollies in too much otherwise they won't spurt out when you cut the cake, just leave some room in the hole. 
Place the last layer on top as a lid and start your frosting. It doesn't have to be neat if you like the rustic look. Leave some frosting for the piping. 
Clean the base to make neat and ready for the piping.
For the piping I used a star nozzle, again not making it perfect. 


Bunting Flag Topper


Cut two skewers to the size you like, taking into consideration the depth that will be in the cake. Then add the tape to the string by folding over the string. Make the gaps even and add as many as you'd like.
Place all the tape pieces over each other and cut the bottoms to make an even length. Then cut two diagonal slots to make the flag shape. All the flags should be the same size now. 
Add the string to the skewers, measure it to the cake so its not too long.

Happy cake making! 


Tuesday 6 August 2013

Printed baby bib Diy


Some of my most fondest memories as a child were creating crafts with my mother.
One craft that was one of my favourites is potato stamping. I decided to try this same
technique on fabric baby bibs. This is a simple yet effective technique that anyone
can use.

TOTAL COST: $25


What you will need and how to DIY:

Packet of 7 baby bibs from Kmart $5 | Heat set fabric paint $20 | potato | knife | brush | bowl


Cut the potato in half and using a marker create a shape. Using the knife, cut the shape out.


I decided to brush the paint onto the potato instead of dipping it in the bowl because the consistency was too thick and the paint was going on uneven.
Press the potato onto the bib pressing hard to ensure the paint is transferred evenly. You can use other objects to create patterns. I used the end of the paintbrush to create little polka dots. 
Allow to dry overnight.
To set the paint use a hot iron (cotton setting) over the fabric. I used a piece of calico over the bib to protect the iron in case any accidents happened. I ironed the bib for 3-5 minutes.

FINISHED PRODUCT


Thursday 28 March 2013

DIY Ombre dyed eggs


I can remember painting eggs at Easter time with my family and it was something I really enjoyed. As an adult I still have the urge to paint eggs during the time of Easter and felt I should continue the tradition but with a mature twist. I have currently been obsessed with the subtle colour change of ombre and really wanted to give it a go on some hard boiled eggs.
This is a DIY for ombre dyed hard boiled eggs.

Have a happy Easter.
TOTAL COST: $0.00


What you will need and how to DIY:

Several hard boiled eggs, a deep bowl and food colouring of your choice. I chose a blue food dye and added a few drops of black food colouring. You will also require a blob of sticky blue tac and skewer. 


Attach the skewer to the top of the egg with the blue tac. 


Fill your small bowl with water and add a few dashes of vinegar, then add a few drops of colouring. Test the colour of the water with some paper and add more colouring until paper is stained with a vibrant colour. You may wish to pre-soak the eggs in a weak coloured solution before adding it to the skewer so that no natural colour remains. 
Dip the egg into the strong solution and leave for less than one second and let to dry. You may place the egg on a cup hanging by the skewer to collect the drips. When dry, dip the egg into the solution again, this time dipping it less in and for longer. Continue this process until you reach the bottom of the egg. When dry, use a damp tissue to polish and blend the dye so there are no harsh lines.

FINISHED PRODUCT


Friday 8 March 2013

Caro's Faves 1.1

one | This beautiful pompom garland from Happy Circus is perfect to add colour to any room $23.14. two | Natural wood paired with white is one of my favourite things to look at. This TV tray is simple yet beautiful and will certainly be my next purchase from Target for only $15. three | Lately I have seen a lot of painted wooden serving ware. Anthropologie takes it one step further with this ombre Dip-dyed serving set for $26.00. four | Ikea sure knows how to make cute things and this yellow cloud napkin holder is no exception for $1.99.  

Wednesday 27 February 2013

Inspirational Venn Wallpaper - Free download


No matter what industry of work you are in it is always important to find the right balance when it comes to happiness, money and your capabilities. For many of us it seems almost impossible to find that perfect balance and this can be discouraging. As a designer I rarely get the perfect client who will let me design whatever I love. When I do get to design something I love, it reminds me why I got into design. What is even better is when I get paid to do what I love. The perfect mix of passion, capability and earning a living is possible, you just have to work hard to get there. Hopefully one day we will all get to this place, right in the center of this venn diagram.
Download the free desktop wallpaper here